Tuesday, 12 March 2013

Dip Dye Routine

I have dyed my hair in the past using wash in wash out dyes and also by going to a salon. Because I have ginger hair, it apparently makes it harder to dye. My colourist said that red hair doesn't take the colour as well as say blonde or brunette hair does. This means that you may have to colour your hair numerous times before you see a big difference in colour if you have red hair.

One of the latest hair trends is dip dye. This is something that I wanted to try and so I decided to get the L'Oreal Preference Wild Ombres dip dye kit. I use Number 3 for blonde to dark blonde hair (there are three different coloured kits!).


(make sure you brush your hair through well before you start!)

The kit is really easy to use and comes with everything you need and step by step instructions on how to prepare the dye and then apply it. Due to the dye containing ammonia and hydrogen peroxide, its best to apply it in a well ventilated area, such as a bathroom where you can open the windows because it doesn't smell very nice!


The kit

I have used the kit three times. The first time I followed the instructions step by step - using the applicator brush to apply it and leaving it on for the maximum but not over the time period stated which is between 25 - 45 minutes depending on the desired colour.

After applying the colour, leaving it, washing the dye out and drying my hair, I could see a noticeable difference in the colour of my hair but not the change that I was hoping for. I reapplied the dye soon after the first time I dyed it to give a 'boost' to the colour.

On the second application, I used my hands to spread the dye through (wearing the gloves that you're supplied in the kit!) and left the colour on for longer - probably an hour. When I rinsed my hair and dried it, I was really pleased with the results and it was how I wanted it to look!


Mixing the colour

The third application I did was on Saturday and that was because I felt the colour had faded and so I wanted to give it another boost. I was pleased because it hand't needed to be redone for a good four months.

The only issues I have with this product, which is something I found with all the dyes I have tried, is that it makes the ends of my (heat damaged) hair extremely dry and quite frankly, disgusting. This means I do have to deep condition my hair to restore it.

As I mentioned, the dye stinks and although you are supplied with a colour protect shampoo to wash the dye out with, I have washed my hair twice after dying it to get rid of the smell left on my hair.

Because this kit is only intended for dip dying purposes, you do not need to do a patch test as with most home and salon dye kits because in theory the dye shouldn't touch your skin/scalp. However, I am slightly wary with dye because my family has a history of alopecia and so I was careful not to get it too close to my scalp.

I am really pleased with the results and I am sure that there is a kit for everyone due to the fact that the longer/shorter the time you leave it on for the more/less intense the colour.


The end result

You may have also seen my OOTD post which showed quite well my recent dip dye!

Monday, 11 March 2013

Manicure Monday

This weeks manicure is from yesterdays Mother's Day lunch. As I said in my OOTD post, I was wearing Fiji by Essie.

This colour is being worn everywhere and everyone is blogging about Fiji and tonnes of other Essie colours. There colours are amazing! There are always at least three shades of each colour so you are bound to find something suitable for you skin tone/mood/outfit etc.

Essie also do really good topcoats (which I always use). They do a couple of different 'types' including a chip resistant one which is what I have, a strengthening one and a high shine one among others. I would certainly recommend any of their colours and topcoats.

Although I love love love Essie and their products, at first I was a bit wary. I had just brought a lovely new nail polish colour and when I tested it at home the consistency was rather watery and the polish seemed to bleed around my nail bed. After feeling slightly disheartened by the outcome of this amazing nail polish brand I decided to give it another go. This time was far better but I did sit and shake the bottle throughly for a while to shake up the polish.

Essie also makes a great alternative to Nails Inc. a nail polish brand I rave about and cannot sing their praises enough! They are also cheaper, retailing for around £7.99 compared to £11.

Anyway, I am utterly thrilled with Essie nail polishes now and shaking the bottle really well before applying is something I naturally do now before using this brand. I shake before using any brand but make sure you do really well with this one!

This manicure Monday's look is something like this....


Sunday, 10 March 2013

Mothers Day Outfit Of The Day!

Today as it is mother's day, my family and I went out for lunch. We went to Loch Fyne and had a really lovely meal. Because the restaurant was quite casual so I wore jeans and a denim jacket.


My jeans are from Topshop and they are the khaki green Leigh jeans. Im also wearing Topshop desert boots and a black Topshop peplum top. My black clutch bag is from H&M and my denim jacket is my new Zara bargain!


The jewellery I'm wearing is my rose gold chunky chain necklace from ASOS and my gold moustache ring from Accessorize.

I was also wearing Fiji by Essie on my nails which you can see in tomorrow's Manicure Monday post!

I hope you all had a lovely mothers day and that you have enjoyed my OOTD post, comment if you want to see more of them! Make sure you check back tomorrow to see my manicure and I will also be doing a hair dip dye post soon!

Thursday, 7 March 2013

Real Technique Brushes

Recently I brought myself the Real Techniques Core Collection brushes as everyone has been talking about them for so long and I felt I was in need of some new brushes.

I thought that the core collection would be the best set to start with as I have the MAC 187 brush which is a large stippling brush and so I didn't feel the need to buy the stippling brush separately! 

The collection comes with four brushes which personally I think are just as amazing as MAC brushes. They are also really reasonably priced at £21.99 at Boots - this also is great considering my 187 brush was nearing £35 for one!

Core Collection Brushes with stand/case

The first brush I am going to show you is the Detailer Brush. I should mention here that the on the back of the packaging it suggests what you use the brushes for which is handy if you want some help/inspiration! The packaging suggests that you use this brush for concealing problem areas or using it for lipstick. Many of the core collection reviews I have seen/read have said that this brush is a let down considering the rest are amazing. Personally I have only used this brush when applying a lipstick because the head is too small for anything else.

Detailer Brush

The next brush is the Pointed Foundation Brush which again I personally think is too small but I love to use it for things like primer where you don't need to apply the product to your whole face and just use it on target and problem areas. This brush is also great for blending in your concealer and touch ups during the day.

Pointed Foundation Brush

The Buffing Brush is my second favourite in the collection. It is ideal for full face coverage when using powder and mineral foundation. I like to use it for blending and running over any lines once my make up is done. Its also really useful when applying a setting powder or when doing touch ups.

Buffing Brush

The final brush in the collection is my favourite and from all the reviews that I have read seems to be most peoples too! The Contour Brush can be used to apply highlighter, blush and bronzer to the apples of your cheeks, cheekbones, or for contouring your face. The brush is nicely tapered so it fits to your face really well and is perfect for doing all the jobs it promises!

Contour Brush
(this brush is smaller and more delicate)

As I said, these brushes are amazing quality - they are so soft and do their job perfectly. Because the bristles are made from taklon they don't soak up liquid products because they are synthetic and so it means your not wasting product and you don't need to wash them as often! This said you should still wash you brushes every week! 

They are really affordable and I suggest everyone should own at least one! However, for one brush it costs anywhere between £7 and £12 for the stippling brush. Therefore, I would buy all three collections as I think it is better value for money getting all the brushes rather than just a few!

Many of you probably know that Real Techniques was created by Samantha Chapman from Pixiwoo which she does with her sister Nic, from YouTube. I 100% recommend that you go and look at their videos because they offer great tips, high street alternatives to luxury brands and they always look lovely!

Sunday, 3 March 2013

Everyday Make Up

These are the items I like to wear everyday. They provide good coverage and a quick and easy look. This also is the foundation to other make up looks such as an evening look.


Two Faced Natural Eye Palette
Collection 2000 Cover Stick
Carmex Original Lip Balm
Benefit Moisturiser
Benefit Their Real Mascara
Rimmel Scandalous Eyes Mascara
Benefit Watts Up Highlighter
Benefit That Gal Primer
Nars Laguna Bronzer
Nars Desire Blush
Benefit Girl Meets Pearl Highlighter
Maybelline Stay Matte Pressed Powder
No.7 Lipstick in Classic Rose 
Mac 187 Brush
Bare Minerals Flawless Face Brush
Topshop Eyelash Curlers
Autograph at Marks and Spencer Foundation Brush
No.7 Eyebrow Brush

I like to keep my daytime make up simple, so I won't always add a lipstick and highlighter if I want a more natural and neutral look. There are only a few products included in this look and so it makes it really easy to travel with as theres not a lot to pack!

Monday, 25 February 2013

Manicure Monday

This week seems to have gotten colder again with a few snow flurries so I thought I would paint my nails in a bright summer shade to make me feel better - and it did the trick! Although its made me really want summer and warmer weather to hurry up.

This Monday I am wearing one of my newest shades from Topshop called 'The Green Room'. It isn't really a green shade, but more of a turquoise/blue. Either way I think its gorgeous and will go really well with some of my summer outfits and bikinis.

The one thing I dislike about Topshop nail polishes is that they don't seem to last too long and I find myself having to properly paint my nails. Meaning I have to add a basecoat as well as a topcoat. I know you should do this every time you apply polish to stop your nails from staining, but sometimes I don't have the time! Anyway apart from that the colours are amazing and I love them!


Saturday, 23 February 2013

New Nail Polish Haul

Today I went shopping in Windsor with my mum on a mission to get a few things - new jeans, a new dress, Real Techniques brushes and some new nail polish!

After having a girly night in chatting, watching a film and painting our nails, I realised that among the hundreds of polishes I own, there was nothing that jumped out at me to use. I was tempted to apply a glitter polish but then decided I couldn't deal with the hassle of taking it off...

So whilst in Boots this afternoon (where I probably spent my entire life savings!) I brought five new polishes. I gave in to the Essie Fiji trend and brought myself one along with the Essie No Chips Ahead topcoat. I also got a Mavala polish in Freshy. Also following the trend, I got myself the Barry M Gelly Hi Shine polish in Blueberry (the gorgeous lavender/blue shade everyone is wearing) and as there was a discount on I also got Prickly Pear with is a gorgeous lavender Gelly Hi Shine colour.

Fiji by Essie

No Chips Ahead Top Coat by Essie

Freshy by Mavala 

Blueberry by Barry M

Prickly Pear by Barry M

I also got the Real Techniques Core Collection brush set and was dragged out after I had picked up a few essentials such as face wipes, polish remover, shampoo etc. Make sure you check back for my Core Collection review coming soon!

Thursday, 21 February 2013

So I know I have already posted today, but seeing as due to the amount of work I have had to do lately I haven't been posting every day I thought I would post something quick.

On my 'Contact Me' page I have mentioned that I have a Bloglovin' account that allows all my readers to follow me so that they are kept up to date with all my posts.

The web address to follow me is: http://www.bloglovin.com/jessie or you could click on the 'Follow me on Bloglovin' button on the side bar.

It would mean so much to me if everyone that reads my blog would follow me on this. I have had so many readers from around the globe, the US, Sweden, Denmark and so many others!

Thank you all for reading my blog and I hope you continue to :-)

10 Shades of Red, Pink and Brown...

As I was clearing through my makeup collection, tidying and cleaning through all my products and taking some snaps to use in future blog posts, I came across my lip draw and saw many of my favourite lip colours.

In my Fashion Week post, I commented on someones beautiful pink lip teamed with nude makeup. A pink lip is my go-to gem. It can add a spot of glamour and elegance to any outfit and can be teamed with virtually anything.

So, in clearing out and sorting through all my make up bits and bobs I compiled my top 10 lipsticks in the red/pink/brown shades category. Here is what I came up with...


The lipsticks left to right are:

Rimmel Lasting Colour, number 12, Valentine
No.7 Moisture Drenching, number 55, Pink Crush
No.7 Stay Perfect, Classic Rose
Shiseido, Perfect Rouge
Estee Lauder, number 06,Lush Rose
Barry M, number 52
Barry M, number 155
Estee Lauder, number 161, Pink Parfait
No.7 Moisture Drenching, number 75, Sugar Plum
Benefit, Thrillin' Brazillian


I like my lipsticks to look glossy as I find adding a gloss over the top of a lipstick can look heavy, make your lips sticky and on me, I find they come off quicker. 

For the Rimmel lipstick, this is slightly too gloss for my liking, and so I tend to blot it on a tissue after applying and wear a red lip liner underneath to give the lipstick something to stick too.

I tend to rarely wear 'brown' coloured lipstick, however, the Benefit lipstick is more tan and looks great with neutral make up on holiday when you have a bronzed glow.

You may wonder why I haven't featured any Mac lipsticks in my collection. If I was going to do a list including Mac then the whole list would be by Mac! I felt that some of these shades are similar to Mac colours and so gave a fresh alternative to the Mac colours people tend to show. I am thinking of doing a Mac lipgloss collection though because I seem to have thousands of them all over the place!

A bright lip is certainly one of my favourite things to wear and I prefer wearing bright lipstick to a heavy smokey eye. It can add colour to a monochrome or dark outfit and lights up your face.

I can't wait for spring and summer to arrive as then I can wear even more bright lips!

Tuesday, 19 February 2013

London Fashion Week

Today I went to London Fashion Week 2013! Today was the last day and there was such a buzz in and around Sommerset House which is where the main event happens. This year, Manolo Blahnik designed the backdrop for Fashion Week. Inside the 'Little Black Book' which contains all the details for press and buyers at LFW, Blahnik says 'English women and their style inspire me tremendously. [The] series of drawings represents some of the figures [he] adores...'.


Being in and around Sommerset House Courtyard Show Space provided me with excellent views of the fashion famous, press, bloggers, buyers and general public which had turned out in their masses. If you have never been to LFW, then it is a great place for people watching with its numerous eateries and coffee shops. You will find many of the fashion elite sitting chatting over a coffee and press and buyers roaming the cobbles of the courtyard. I lost count the number of times I walked around, snapping away at anything and everything that caught my imagination. Everyone is carrying a camera or a piece of recording equipment and wandering up to strangers asking to photograph their fur coat (of which there were lots of in an array of colours) or their studded Louboutins (of which I saw many).

All of the subjects of my photos remain anonymous, letting their personal style shine through. This one buyer caught my attention with her immaculate, bare minimum make up with pink lip and white fur coat.


As for the rest of the people I snapped away at, they have mainly been caught on my camera for their original and unique style or individuality. Colour is definitely going to be big this autumn/winter and these fashion goers prove just that...


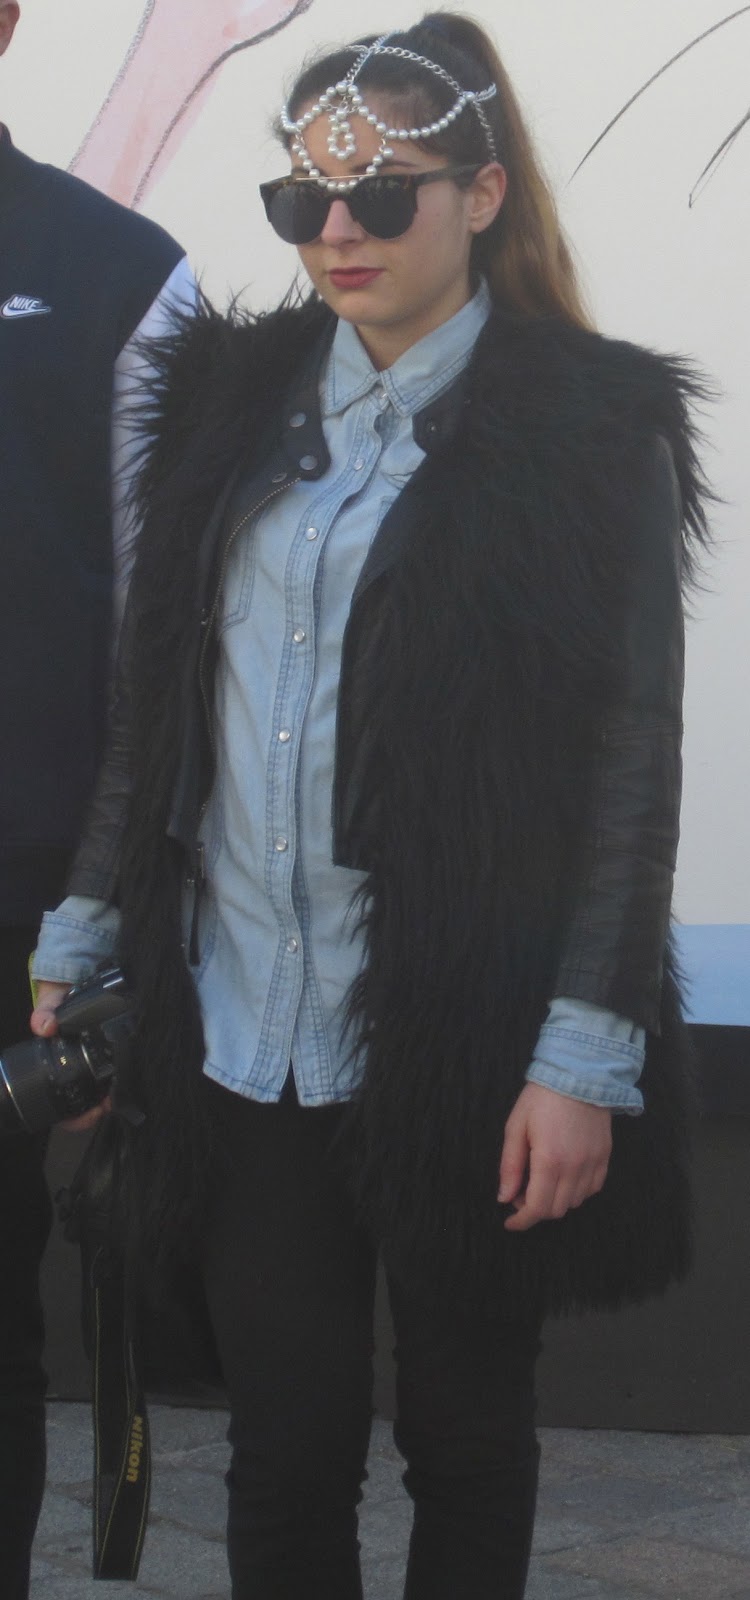
I love her pearl headress and denim/fur combo - an off duty style winner for me.


Original, with a hint of colour. I love his man (clutch) bag, although he was brave to wear shorts today - it was cold when you were out of the sun!


I love her acrylic Chanel 'dripping' earrings and her studded shoulder blazer. Striped jeans were everywhere today and LFW darling Cara Delevingne has been seen leaving shows wearing some herself!

So there are just a very small selection of some of my favourite snaps of today. My first LFW experience was amazing and I will certainly be back in September for more fashion goodness.

I would like to thank everyone who allowed me to photograph them today and talked to me about what they were wearing and their thoughts on London Fashion Week.